Biological Macromolecules
Welcome to your pre-lab reading for the Macromolecules lab! This guide will help you understand the fundamental concepts behind the tests you’ll be performing to identify carbohydrates, proteins, and lipids. Understanding these basics will make your lab experience smoother and more meaningful.
1. Macromolecules
Our food, and indeed our bodies, are made up of large organic molecules called macromolecules. These are essential for life and can be broadly categorized into four main types: carbohydrates, lipids, proteins, and nucleic acids. In this lab, we’ll focus on identifying the first three.
- Carbohydrates: These are our primary source of energy. They range from simple sugars like glucose (which your cells use directly for fuel) to complex carbohydrates like starch (a way plants store energy) and cellulose (which forms plant cell walls).
- Analogy: Think of carbohydrates as the body’s gasoline. Simple sugars are like high-octane fuel for quick energy, while starches are like a reserve fuel tank.
- Proteins: The workhorses of the cell! Proteins have incredibly diverse functions. They form structures (like hair and nails), act as enzymes (speeding up chemical reactions), transport molecules (like hemoglobin carrying oxygen), and much more. Proteins are made of smaller units called amino acids. Egg white (albumin) is a common example of a protein.
- Lipids: This group includes fats, oils, waxes, and steroids. They are crucial for long-term energy storage, insulation, forming cell membranes, and producing hormones. Lipids are generally insoluble in water. Cooking oil is a familiar lipid.
Identifying these macromolecules in different samples (like your “Unknown X”) is a common task in biology and biochemistry. The tests you’ll perform are qualitative, meaning they tell you if a substance is present, rather than how much is present.
2. Controls in Experiments
In any scientific experiment, controls are essential. They are samples that you test alongside your experimental samples to ensure your results are valid. Without controls, it’s difficult to be confident in your conclusions.
-
Positive Controls: A positive control contains the substance you are testing for. If you perform the test on a positive control, you should get a positive result.
- Why use it? It confirms that your reagents (the chemicals you use for the test) are working correctly and that your experimental setup can indeed detect the substance if it’s there. If your positive control doesn’t give a positive result, something is wrong with your test (e.g., old reagents, incorrect procedure).
- In your lab: Glucose solution is a positive control for Benedict’s test.
-
Negative Controls: A negative control does not contain the substance you are testing for. It should give a negative result.
- Why use it? It shows what a negative result looks like and helps ensure that there’s no contamination or that the reagents themselves aren’t causing a false positive reaction.
- In your lab: Distilled water is used as a negative control for all tests because it lacks carbohydrates, proteins, and lipids.
Think of it this way: Imagine you’re testing a new “magic” pen that only writes on gold.
- Your positive control would be trying the pen on a known piece of gold. If it writes, your pen works!
- Your negative control would be trying the pen on a piece of paper (not gold). If it doesn’t write, that’s expected. If the pen writes on paper, then it’s not specific to gold, or something is wrong with your test!
3. The Tests
You’ll be performing several chemical tests. Each test is designed to detect a specific type of macromolecule based on a characteristic chemical reaction that often results in a color change or other visible effect.
 Figure 1. Macromolecues identification
3.1 Carbohydrate
Figure 1 shows the general setup for these tests, typically involving adding reagents to your samples in test tubes.
a) Benedict’s Test: Searching for Reducing Sugars
- Detects: Reducing sugars. These are simple carbohydrates (monosaccharides like glucose and fructose, and some disaccharides like lactose and maltose) that have a free aldehyde (-CHO) or ketone (C=O) group that can “reduce” (donate electrons to) other compounds.

- Reagent: Benedict’s Reagent. This is a bright blue solution containing copper(II) sulfate (CuSO₄).
- Principle: When heated in an alkaline solution, reducing sugars donate electrons to the blue copper(II) ions (Cu²⁺) in Benedict’s reagent. This reduces the copper(II) ions to copper(I) oxide (Cu₂O), which is an insoluble precipitate. The color of this precipitate varies from green to yellow to orange to brick-red, depending on the concentration of the reducing sugar.
- Blue Cu²⁺ (soluble) + Reducing Sugar + Heat → Red/Orange/Yellow/Green Cu₂O (precipitate)
- Procedure Snapshot: Add Benedict’s reagent to your sample, heat in a boiling water bath for a few minutes.
- Positive Result: A color change from blue to green, yellow, orange, or brick-red. The more intense the red color, the higher the concentration of reducing sugar. (Imagine a traffic light: green for small amounts, yellow/orange for medium, red for high amounts.)
- Negative Result: The solution remains blue (or may have a slight cloudy blue precipitate if the reagent is old, but no color change to green/yellow/orange/red).
- Positive Control in Your Lab: Glucose solution.

- Watch a Demo:
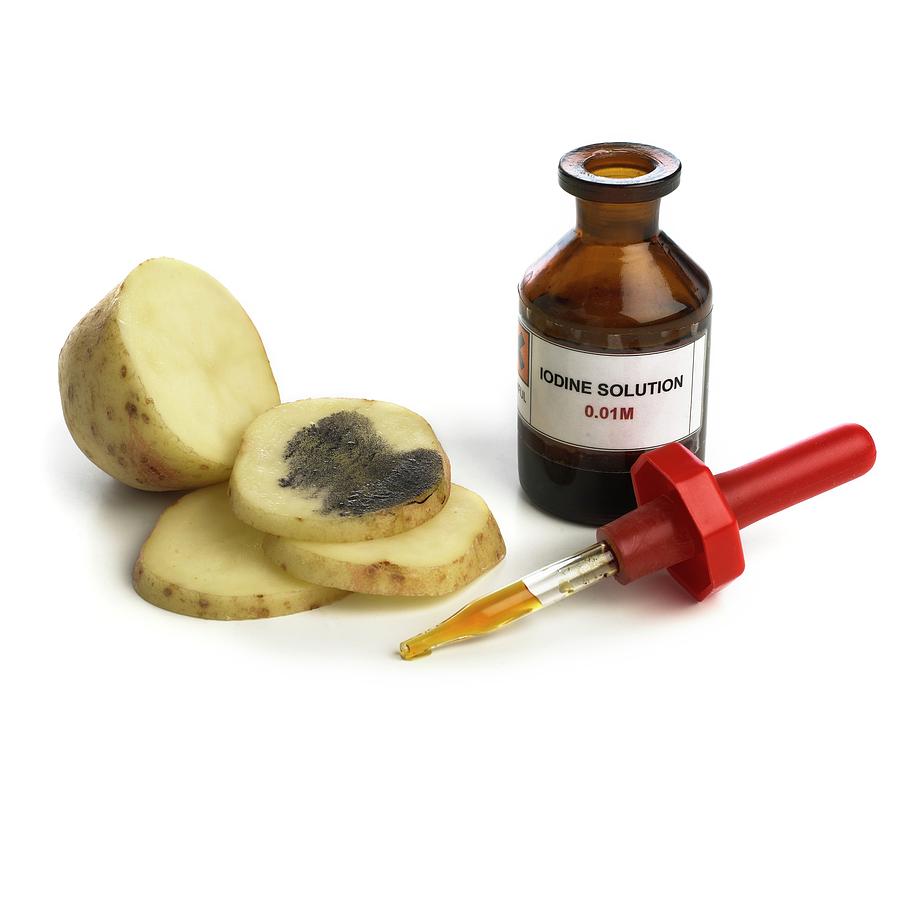
b) Iodine Test: Identifying Starch
- Detects: Starch, a complex carbohydrate (polysaccharide) made up of long chains of glucose molecules.

- Reagent: Iodine Solution (often called Lugol’s Iodine or IKI solution), which is yellowish-brown or amber in color.
- Principle: Starch molecules are typically coiled into a helical (spiral) shape. The iodine molecules (specifically, triiodide ions, I₃⁻, present in the solution) fit neatly inside these coils. This interaction forms a starch-iodine complex that absorbs light differently than iodine alone, resulting in a distinct color change. Simple sugars or disaccharides are too small to form this complex.
- Analogy: Think of starch as a spiral staircase, and iodine molecules as tiny guests that lodge themselves within the turns of the staircase, changing its overall appearance (color).
- Procedure Snapshot: Add a few drops of iodine solution to your sample. No heating is required.
- Positive Result: A color change from the yellowish-brown of the iodine solution to a deep blue-black or very dark purple.
- Negative Result: The solution remains yellowish-brown (the color of the iodine reagent itself).
- Positive Control in Your Lab: Starch solution.

- Watch a Demo:
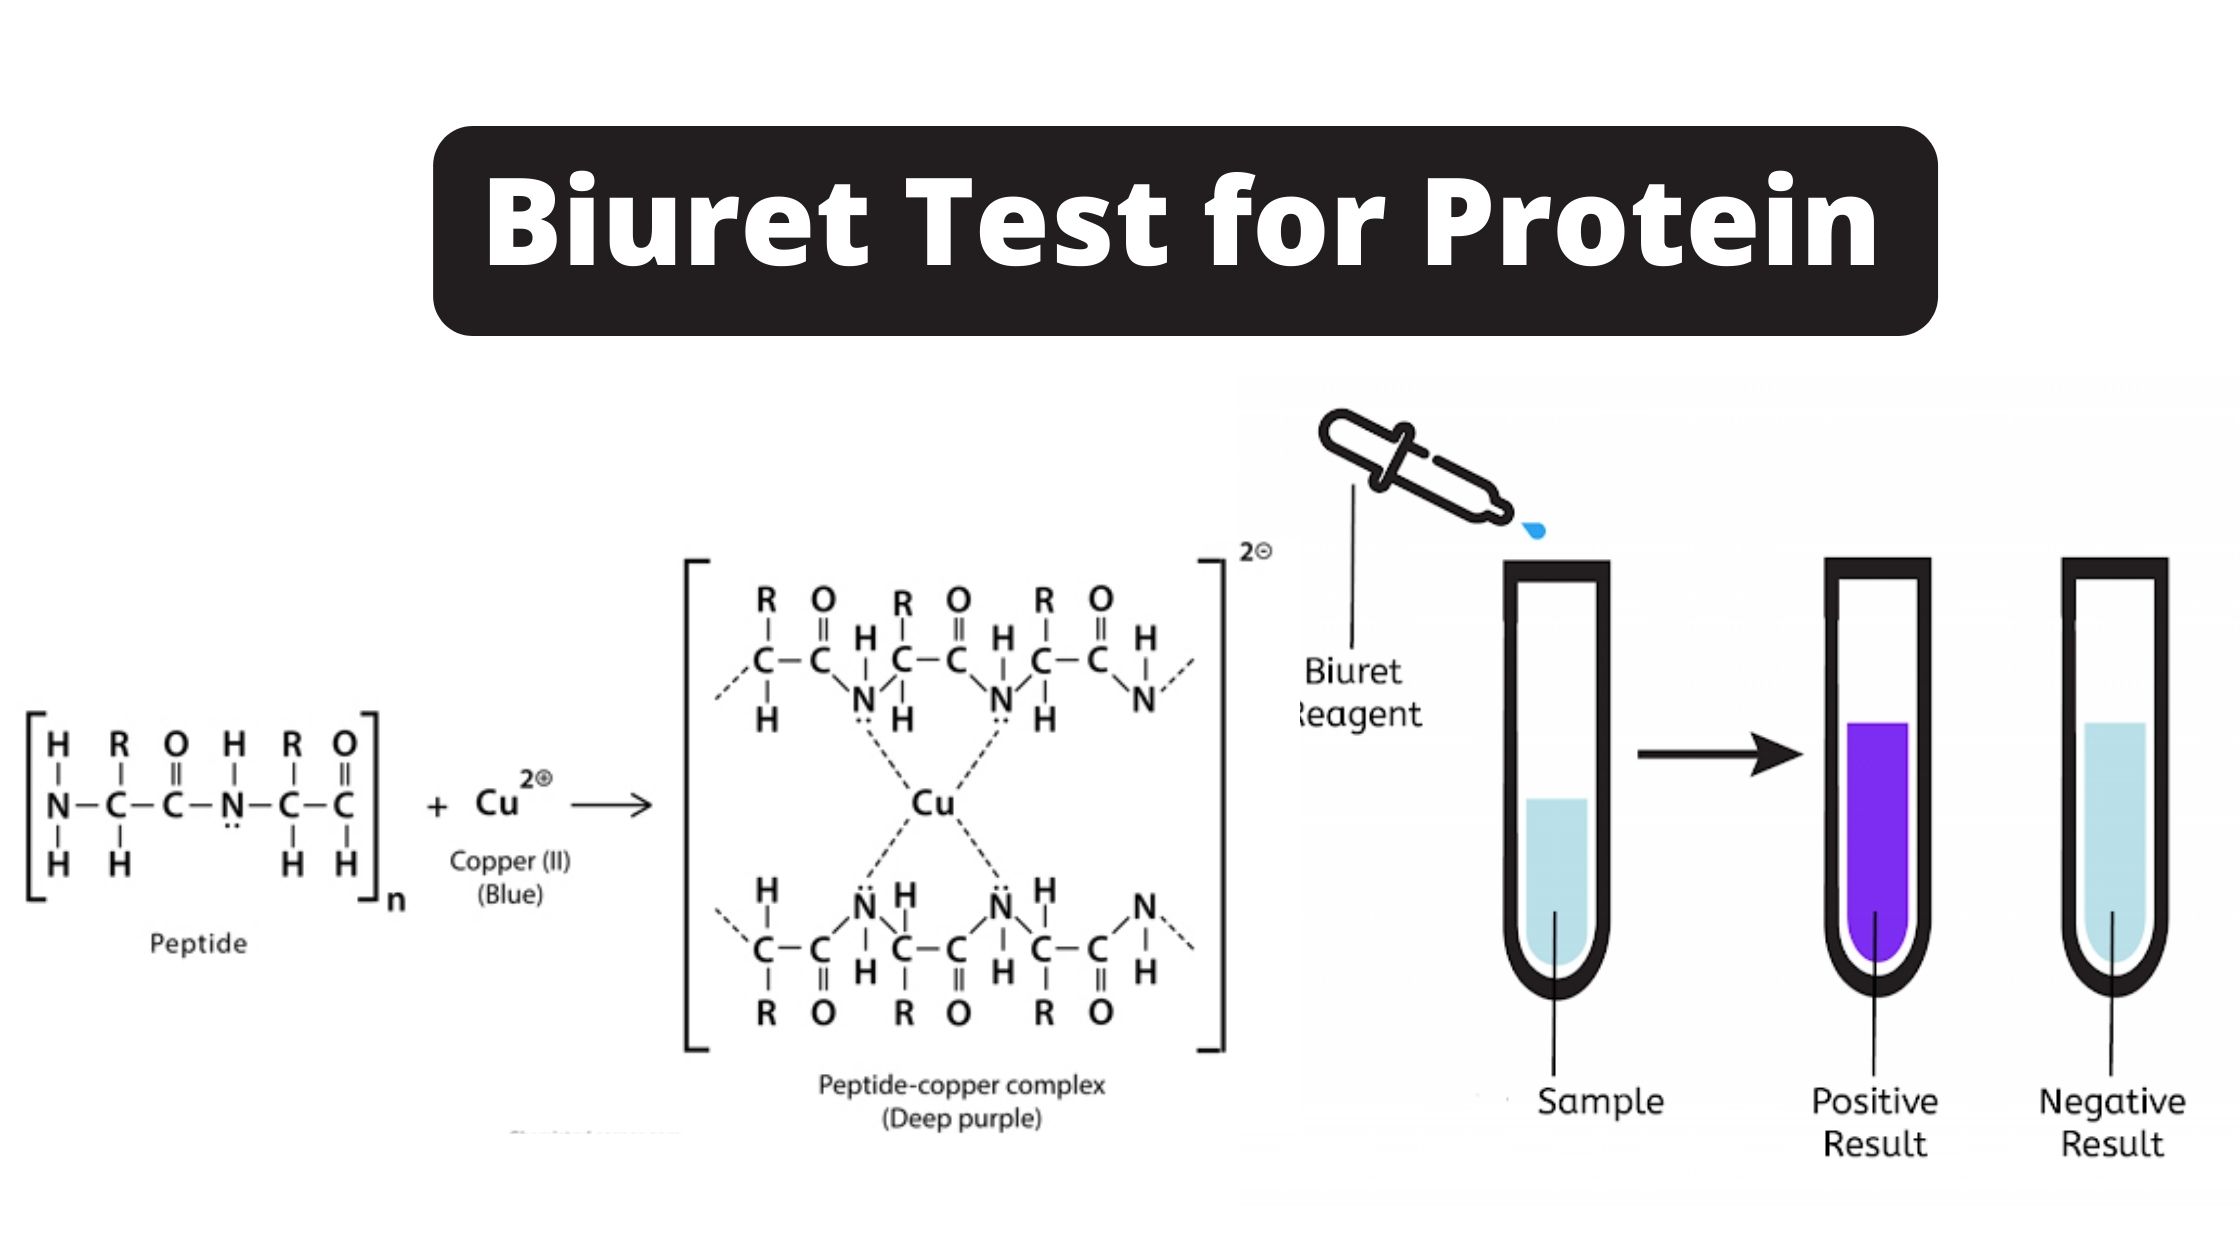
3.2 Protein: The Biuret Test
- Detects: Proteins (specifically, the peptide bonds that link amino acids together in a protein).

- Reagent: Biuret Reagent. This is typically a blue solution containing copper(II) sulfate (CuSO₄) along with a strong alkali like sodium hydroxide (NaOH) or potassium hydroxide (KOH), and often sodium potassium tartrate to keep the copper ions in solution.
- Principle: In an alkaline (basic) environment, the copper(II) ions (Cu²⁺) from the Biuret reagent react with the nitrogen atoms involved in peptide bonds. This forms a violet-purple colored coordination complex. At least two peptide bonds are generally needed for a noticeable purple color.
- Analogy: Peptide bonds are like specific ‘handles’ on a protein molecule. The copper ions in the Biuret reagent ‘grab onto’ at least two of these handles, and this interaction causes the color change.
- Procedure Snapshot: Add Biuret reagent to your sample. Mix and observe. No heating needed.
- Positive Result: The solution changes from blue to violet or purple. A pinkish color might indicate the presence of shorter peptide chains (peptones or proteoses), but a clear violet/purple is characteristic for proteins.
- Negative Result: The solution remains blue (the color of the Biuret reagent).
- Positive Control in Your Lab: Egg white solution (which contains albumin, a protein).

- Watch a Demo:
3.3 Lipid: The Grease Spot Test
Refer to the “2. Lipid Test – Grease Spot” description and the “Lipid Test - Grease Spot” diagram in your lab handout.
- Detects: Lipids (fats and oils).
- Reagent/Method: Filter paper.
- Principle: Lipids are non-polar and hydrophobic (water-repelling). When a substance containing lipids is placed on paper, the lipids spread out and fill the air spaces between the paper fibers. This reduces the scattering of light, making the spot translucent (allowing light to pass through, though not forming a clear image). Water, if present, will evaporate, and the paper will become opaque again. Lipids, being non-volatile, will leave a permanent translucent “grease” spot.
- Procedure Snapshot: Place a drop of your sample on filter paper. Allow it to dry completely. Then, hold the paper up to a light source.
- Positive Result: A permanent translucent spot remains on the filter paper after drying. It will look oily or greasy.
- Negative Result: No permanent translucent spot. If the sample contained water, the spot will disappear as the water evaporates, and the paper will look opaque as before.
- Positive Control in Your Lab: Cooking oil.

- Watch a Demo:
4. Preparing for the Lab
As you approach your lab session, keep these points in mind:
- Read the Procedure Carefully: Before starting, review the “Procedure Overview” and “Detailed Procedure” in your lab handout. Know what you need to do for each test.
- Observation is Key: Science is about observation! Pay close attention to the initial appearance of your samples and reagents, and carefully note any changes (color, precipitate formation, translucence).
- Record Keeping: You’ll have a table (“Results & Analysis” in your handout) to record your observations for the positive control, negative control, and your unknown sample for each test. Be precise and descriptive.
- Safety First! This is paramount in any lab:
- Wear your lab coat and gloves as indicated.
- Handle hot test tubes with care, using a test tube holder, especially after heating in the Benedict’s test.
- Be mindful when handling chemical reagents. Report any spills to your instructor.
- The Unknown Sample (“Unknown X”): Your main goal is to use the knowledge from testing the controls to determine which macromolecules are present in your “Unknown X” sample. Compare the results from “Unknown X” directly with your positive and negative controls for each test.
5. Summary of Tests and Expected Results
Here’s a quick reference table to consolidate what you’ve learned:
| Test Name | Detects | Reagent(s) Used | Positive Result | Negative Result | Key Indicator(s) for Positive |
|---|---|---|---|---|---|
| Benedict’s Test | Reducing Sugars (e.g., glucose) | Benedict’s Reagent + Heat | Green, yellow, orange, or red/brick-red precipitate | Stays blue | Color change from blue |
| Iodine Test | Starch | Iodine Solution | Blue-black/Dark purple color | Stays yellowish-brown (color of iodine) | Blue-black color |
| Biuret Test | Proteins (peptide bonds) | Biuret Reagent | Violet/Purple color | Stays blue | Violet/Purple color |
| Grease Spot Test | Lipids (fats, oils) | Filter Paper | Permanent translucent spot | No permanent translucent spot (dries opaque) | Translucent spot on paper |
By understanding these principles and being observant, you’re well on your way to successfully identifying the macromolecules in your samples. Good luck with your experiments!
- Resources
- API
- Sponsorships
- Open Source
- Company
- xOperon.com
- Our team
- Careers
- 2025 xOperon.com
- Privacy Policy
- Terms of Use
- Report Issues